
To see if this custom-fit item will work for you please tell us what vehicle you'll use it with.


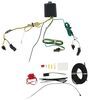
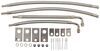
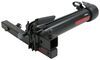
This fully welded trailer hitch receiver bolts onto your vehicle's frame with no welding required. Textured black powder coat over e-coat shields against rust and corrosion.
Features:
Specs:
At etrailer.com we're committed to the products we sell, and to our customers. Our experienced and knowledgeable staff are available via both phone and email to address your questions and concerns for the lifetime of your hitch. The technicians at etrailer perform hitch installations on a daily basis, making them a valuable resource for do-it-yourselfers. The one-on-one, personal service you'll receive comes straight from an expert in the towing and automotive field. We've installed it, we've wired it and we've towed with it, so whatever your question, we can answer it.
California residents: click here
Videos are provided as a guide only. Refer to manufacturer installation instructions and specs for complete information.
Hi, I'm Greg with etrailer. Today we're gonna look at the Blue Ox Trailer Hitch on our 2018 Jeep Compass, and with the Blue Ox hitch, it's got a nice matte black finish on it, powder coat finish, so help from corrosion and chips. It does tuck back up underneath there quite a bit on the Compass. So the hitch sticks out a little bit. It still just ends behind the balance. Otherwise, I think it looks pretty good.
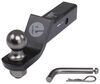
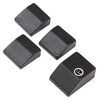
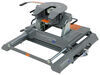
The Blue Ox hitch will allow you to, it'll add more cargo space to your vehicle if you use a cargo carrier. Also, if you have a bike or or two, you can put a bike rack on here, and any light or light towing small medium trailers you can probably tow behind it, but it should be pretty versatile for the Compass. All right, our Blue Ox hitch does have a standard two by two opening, which gives you a good variety of accessories to fit into here. It also comes, has your standard 5/8 pin, which does not come with the hitch but is available here at etrailer. And I would recommend getting a locking pin for your hitch just to make sure that any of your accessories you have on here won't walk off, and your safety loop openings aren't huge but seem like they will work pretty well with most of your slip, that clevis hook, and even if you got the big clevis hook on here, it'll fit in there, a little restrictive, but it fits.
And we'll take some measurements and see what kind of ground clearance we have. We'll measure from the ground to the inside of our opening, and we're at 13 1/2, which should be plenty of room if you're going up any steep driveways or inclines. The hitch does end behind the fascia. So just you're a good inch and a half in. So you wanna make sure that any of your accessories are gonna have enough extension, anything that might fold up won't hit your bumper.
And from the center of your pin, we're looking at about 3 3/4 inches. So again, make sure that any of your accessories stick out far enough so they won't rub on your vehicle, especially anything that folds. And with your Blue Ox trailer hitch, you have a 600 pound tongue weight, which is the down force on the hitch, and a 4,000 pound towing capacity, which is how much you can tow behind the hitch. You will want to check with your owner's manual for your vehicle specifications and go with the lowest number between that and your hitch rating. Okay, the install on this isn't too bad.
It's a little challenging, but for me, you might be better doing it on the ground 'cause then you have to get up in the hitch, and getting your bolts lined up is a little bit of a challenge, and with that said, if you don't feel like taking this on yourself, you can find or look at our dealer locator. Find somebody near you that can install it for you. If you have any questions or comments, please feel free to contact us. If you wanna take this on yourself, follow along and we'll get it installed. Okay, to begin our install, we have two T30 bolts on the bottom of the rear fascia here we're gonna remove. (drill buzzing) Next thing we're gonna do is lower the exhaust. There's gonna be one bolt. We're gonna remove the hangers 'cause we're gonna have to modify the hangers. There's one bolt in each hanger. Before we do that, we will have to support the exhaust. We have a strap on here to support it. If you're on your driveway, you might use a jack stand or a jack to hold it up, but we'll go and take these bolts out, and we will repeat the process on both sides. (drill buzzing) Okay, now we're gonna ahead and drop, lower the exhaust down. Get it out of the way, and we will have to modify our exhaust brackets. We have to bend these tabs down flat, or you can remove 'em if you want on both sides. Okay, now we're gonna go ahead and take down our heat shield 'cause we'll have to remove this. We have three 11-millimeter nuts we're gonna take off and then do some trimming on that. (drill buzzing) Okay, I measured according to the instructions. This is about where the frame is, right in this area, but measured to for the instructions, and I'm gonna go ahead and run a piece of tape, just give myself a little bit an idea of a little bit straighter line, and I would just cut along that tape with my snips. And we'll do that on both sides, and now I'll get it back on our studs and put our nuts back on. Okay, now there's gonna be these little decals or I guess they're kind of stickers. There's one here and there's one on each side covering up the holes we're gonna be using, and then we're gonna need to enlarge this hole, and also we're gonna have to scrape some of this body caulk off of here so it'll let this hitch sit flat. Okay, now on the front hole here, we're gonna have to open this up on each side to be able to feed our hardware through our brackets and our carriage bolts. So you can take a step drill or grind it out. (drill buzzing) Okay, now we're gonna fish our hardware into our holes. We'll start with the front hole, put our fish wire in, and feed our hardware through this hole. And you wanna feel around. You can find the other end of it. Kind of guide it down in here. Pull it through. Then we'll slide our washer plate on and put our bolt on and thread that into the wire. And you want to feed your washer first and then your bolt and come over here. Feed it through like so. Now on the hole that you enlarged, what you'll do is instead of feeding it through, you'll put your washer and your bolt on there and then feed 'em up through the hole first and keep your fish wire down to go through the hitch as you raise it up. Okay, and these brackets are gonna be in the way as we slide our hitch in, so we're gonna have to bend these up back out of the way, and then we'll bend it back down to reattach our fascia after the hitch is installed. Okay, we're gonna trim out our fascia. I measured to the specifications in the instructions, and we'll trim this out for our hitch. Okay, with an extra set of hands, we're gonna go ahead and put our hitch in place. We'll need our, feed your wires through. Make sure you have the right wires to the right holes. Here's my feed over exhaust. Tuck it up in your fascia. Make sure your bolts are back in there so the hitch will go up in there. There we go. I got one through here. It's resting on there. Get the fish wire off. And we can start this nut. Get a little higher so we can get the other bolt to come through. Sometimes they don't want to cooperate. Some patience comes in handy. And there we go. Now we'll go through and tighten our bolts down. Get ready to torque 'em. Okay, I'm gonna go ahead and torque our bolts into place to our specifications in the instructions. Okay, and now we're gonna raise our exhaust back up into place. Okay, and we went ahead and bent our brackets back down for the fascia. Get those back in place before we put our exhaust up into place. Raise the exhaust and we're gonna use, with our brackets modified, we'll put this in through the hitch into the existing frame hole, and we'll go ahead and torque the bolts on our exhaust down to the specifications in the instructions. Okay, and then we'll make sure we put our fasteners in the back balance here, and that'll do it for our install of our Blue Ox Trailer Hitch on our 2018 Jeep Compass.
Info for this part was:
At etrailer we provide the best information available about the products we sell. We take the quality of our information seriously so that you can get the right part the first time. Let us know if anything is missing or if you have any questions.


Thank you! Your comment has been submitted successfully. You should be able to view your question/comment here within a few days.
Error submitting comment. Please try again momentarily.